Sunday, June 9, 2013

Peter Pan Collar - Crochet

My little sister is really into lace collars right now, so I decided to make her one. This is what it looks like:

I used the video tutorial by Yolanda Soto Lopez on Youtube. I asked my siter if she wanted that last row in black too, to frame it and she said that if anything, she'd prefer a border in really pale pink if I had any. I told her that I didn't have any pale pink.
This morning however I went to my stash-stroller to pick up another ball of white and found some really pale pink. I was nearly finished with the last row back then, so I decided to add one more row.
My sister said she liked the fact that my collar turned out pointier than Yolanda's so I decided to accentuate that.
The picture might not be well enough lit for you to see exactly what I did, so I'm gonna explain it.
I basicaly single-crocheted around with the pink, and added picot-stitches. I made one picot-stitch on top of every double-crochet post and one in each V-space (2sc, Ch3, 2sc).
Once this was done, I thought that a little bow could perfect this. I took the black wool again to make one and attached it to the button. (In a way to make interchanging possible).
The bow is very simple to make: It's made around a magic circle. Starting from that circle you have to make a ch5, 3dc into the circle, ch5, slip-stitch into the circle. And do the same thing a second time. Then you finish off and when you pull on the string (the one from the beginning, not the one you just cut off) the hole closes and you have a bow.
This way you can slip it over the button and embellish the collar. I made another two bows int white and pink so that she can choose according to her mood:
My sister even agreed to model the collar for you!
She also put one of the bows into her hair, as you can see, by attaching it to a hair-clip.
Here's a close-up on the collar one last time before this post is finished!
I hope you like this little accessory! Feel free to send me pictures if you make one too! You can send them to me via Twitter @ChibiHako!

Saturday, June 8, 2013

Spiderman Doll - Crochet

I've been planning to make a Spiderman doll for a very long time. So today I went to see my friend Google and asked him for a picture of Spiderman where I could have a nice clear view on the costume. I found this one and am going to use it:
I thought I'd take advantage of the nice weather and crochet outside. I set up my chair and everything.
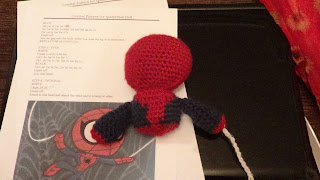
As soon as I was ready to sit down and get going, this happened:
An evil big cloud came and blocked out the sun. Fortunately it left about 15 minutes later and I was able to get some sun onto me.
Anyway! Here comes the Spidey-pattern!
What you need:
- 1x red wool
- 1x white wool
- 1x black wool
- 1x blue wool
- 1x crochet hook
- 1x scissors
- 1x stuffing

STEP 1 - HEAD
RED
Create a circle with 6sc.
Do 2sc in 1sc for 1r.
Do 1sc in 1sc, 2sc in 1sc for 1r.
Do 1sc in 2sc, 2sc in 1sc for 1r.
Do 1sc in 3sc, 2sc in 1sc for 1r.
Do 1sc in 4sc, 2sc in 1sc for 1r.
Do 1sc in 5sc, 2sc in 1sc for 1r.
Do 1sc in 1sc for 7r.
Do 1sc in 4sc, crochet 5th and 6th tgt for 1r.
Do 1sc in 3sc, crochet 4th and 5th tgt for 1r.
Do 1sc in 2sc, crochet 3rd and 4th tgt for 1r.
Do 1sc in 1sc, crochet 2nd and 3rd tgt for 1r. 
Folded in half.
STEP 2 - BODY
RED - BLUE (change as the suit goes)
[Continue where you left off at STEP 1]
Do 2sc in 1sc for 1r.
Do 1sc in 1sc for 7r.
Do 1sc in 1sc, crochet 2nd and 3rd tgt until the gap is closed.
Finish off.
Sew up the gap.
STEP 3 - ARMS
RED
Create a circle with  6sc.
Do 2sc in 1sc for 1r.
BLUE
Do 1sc in 1sc for 5r.
Do 1sc in 1sc, crochet 2nd and 3rd tgt for 1r.
Do 1sc in 1sc for 2r.
Crochet 1st and 2nd tgt for 1r.
Finish off.
Sew the gap onto the body where you want the arm to be positioned.
REPEAT FOR SECOND ARM.

STEP 4 - LEGS
RED
Create a circle with 6sc.
Do 2sc in 1sc for 1r.
Do 1sc in 1sc, 2sc in 1sc for 1r.
BLUE
Do 1sc in 1sc for 6r.
Do 1sc in 2sc, crochet 3rd and 4th tgt for 1r.
Do 1sc in 1sc for 2r.
Crochet 1st and 2nd tgt for 1r.
Finish off.
Sew the gap onto the body where you want the leg to be positioned.
REPEAT FOR SECOND LEG.
CAREFUL!!!! If you want him to hang like mine (read on), you need to put pebbles into the legs, otherwise the head will be too heavy and he will hang upside down.
 
STEP 5 - EYES
WHITE
Create a circle with 4sc.
Ch1, do 2sc in 1sc for 1r.
Ch1, do 1sc in 1sc, 2sc in 1sc for 1r.
BLACK
Ch1, do 1sc in 2sc, 2sc in 1sc for 1r.
Finish off.
Sew onto head.
STEP 6 - OPTIONAL
WHITE
Chain 35.
Finish off.
Attach to one hand and attach the other end to a lamp or other.

Wednesday, June 5, 2013

Tuesday's Tallies A Day Late!

WEDNESDAY:
I stood awake until 4am on Tuesday to try and reach 30 squares. I hit 28 and went to sleep.
Here's a picture of my left forefinger after this madness:
I have decided on wednesday, that I will not making the RedHeart June Challenge Motif Shawl. Instead I will do something else... something summer-y... I don't know what yet. Maybe inspiration will hit me in the next couple of days...

The next couple of days went nearly the same. Until yesterday (Tuesday). I made my last square yesterday and started sewing the last frame onto the blanket. Right now (Wednesday, 2.50pm) I have only 16 squares left. Out of a total of 64 (for that last frame). I hope to be ready for a big Ta-Dah soon.
As soon as I'm finished sewing, I'll give the blanket into my mum's hand who will then take over the rest of the work, the brim. It might however take a while as she had her first chemo this morning. I don't mean that she might not be in shape to crochet, but maybe not in the mood.
Here it is! (10.20pm) I just sewed on the very last square! I have no idea how I'm going to make the whole thing fit into the picture once the brim is around...
Check out all the other One-A-Day-ers on Gingerbreadgirl's blog! Click here!